Installing mods for Minecraft – This guide will take you through all the steps of how to install mods in Minecraft. Mods is a great way to customize your Minecraft experience. While some mods are easy to install, others require a bigger effort to get installed correctly. In this guide we will try to show you how to install mods, in some quick simple steps.
Some mods require other mods to work – these mods are called utility mods. For example some mods require ModLoader to work. If this is the case, the description of the mod will tell you.
This method will work with most mods. But always remember to read the mod description or readme file.
This guide will be updated regularly as Minecraft gets updated.
How to install Minecraft mods on Windows
- Click the Start menu.
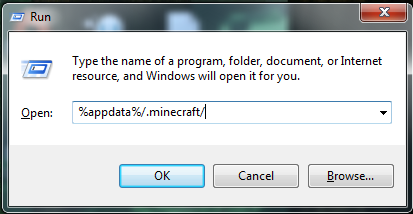
- Type “run” and hit enter. The run dialogue should open.
- Type “%appdata%” and hit enter.
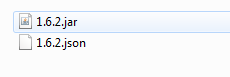
- Go to .minecraft/versions/[minecraft version, e.g. 1.6.2]/
- In this folder there should be a .jar file with the name of the current Minecraft version, e.g. 1.6.2.jar.

- Open the .jar file using an archive software (for example WinRAR or 7zip). To open the .jar file, right click the file and choose Open with.
- Delete the META-INF folder in the .jar file. This is very important.
- Copy the class files from the mod into the .jar file and exit.
- Some mods will require you to copy files into other directories. Please see description or readme for these mods.
Important note: ALWAYS make a backup of your files! Most importantly your save files (located in .minecraft/saves)
If the game won´t start after you installed a mod, you can easily re-install Minecraft.
How to re-install Minecraft:
- Make a backup of your important files, for example:
- Resourcepacks: .minecraft/resourcepacks
- Save games: .minecraft/saves
- Delete the whole .minecraft folder in %appdata%.
- Run the Minecraft launcher
- It will download the necessary files and create a new .minecraft folder.
- Copy your resourcepacks and save games back into the .minecraft folder.
- Now you have a clean install of Minecraft.
Installing Minecraft mods with MCPatcher
- I assume you already downloaded and installed the MCPatcher
- You should start with a fresh install of Minecraft before installing MCPatcher.
- Download the mod you want as a zip file and open MCPatcher.
- OPTIONAL STEP – Place the mod in:
%appdata%\.minecraft\mods\[minecraft version, e.g. 1.6.2] - Click the + sign.
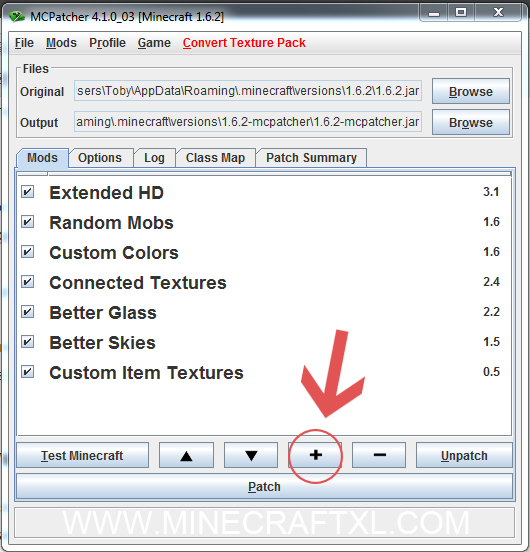

- Navigate to the mod and click open.
- The mod is added to MCPacther – after this click Patch.
- Start Minecraft.
If you have any problems, leave a comment and we or others can try to help you. Also if you find this guide useful, please like, +1 or share this post with your friends. Thank you.